I am creating a custom editor for the grid layout control in that I want to apply Padding and Margin to the columns and cells. I have the editor working - both saving and loading the model.value... so all is good in the back-office.
What I need now is to figure out how to apply these settings to the font-end.
Now when it comes to rendering the markup, it does some weird stuff:
So, my question is: how can I get it to add the correct value to the styles attribute, and how do I go about adding multiple values into the style attribute (I'd like to also create and add a 'Margin' Editor later)
The documentation says you don't need the key attributes - that is what cause your padding not to be applied. The next thing is that you need to save the unit also (the px).
Thanks for reply. Not really wanting to use flexbox as editors use OSx & iOS for the back-office, and support in Safari is not great.
The documentation is not really clear about how attributes and keys are applied. I did read through it and to my understanding of the documentation it was that the key becomes the attribute... hence why I used 'style' for the key.
"key defines the alias the configuration is stored under and by default the alias of the attribute will also be the attribute on the
rendered html element."
And with regards to saving the model.value with 'px'... yeah, I already got that :)
Your key should be the css-property you want to set, in this case "padding". The modifier should not be needed (had it the other way round in my last reply).
About 30 mins after my last post, I actually discovered that file in the project, and once I spotted the helper functions that render the attribute, it all made perfect sense! So your last answer was spot on :)
I got the editor working great now. I even went on to create a back ground editor that allows the user to change settings like background image, position, colour, crop, width, colour, etc... very cool extensiblity point!
I will post my solution here shortly to help the community incase there are others wanting to do the same/similar thing.
Now you can add your new grid layout data type to your doc type, and after clicking the gear in the top right of the row/column, you will see your new settings editor....
And the rendered output looks like this...
I get that the view could be done better (not using tables... I know, I was pressed for time)
Hope this helps others too.
GridLayout custom editor
Hi,
I am creating a custom editor for the grid layout control in that I want to apply Padding and Margin to the columns and cells. I have the editor working - both saving and loading the model.value... so all is good in the back-office. What I need now is to figure out how to apply these settings to the font-end.
My settings are as follows:
The editor looks like this:
Now when it comes to rendering the markup, it does some weird stuff: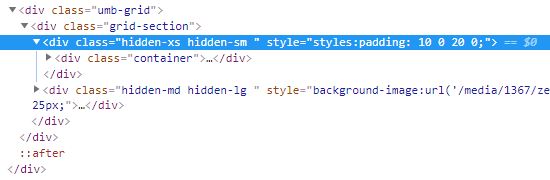
So, my question is: how can I get it to add the correct value to the styles attribute, and how do I go about adding multiple values into the style attribute (I'd like to also create and add a 'Margin' Editor later)
Cheers
first of all, why not create the 4 inputs in a grid? inspiration: https://codepen.io/radibit/pen/LVzgvP
https://our.umbraco.com/documentation/getting-started/backoffice/property-editors/built-in-property-editors/grid-layout/settings-and-styles
The documentation says you don't need the key attributes - that is what cause your padding not to be applied. The next thing is that you need to save the unit also (the px).
Hi Søren,
Thanks for reply. Not really wanting to use flexbox as editors use OSx & iOS for the back-office, and support in Safari is not great.
The documentation is not really clear about how attributes and keys are applied. I did read through it and to my understanding of the documentation it was that the key becomes the attribute... hence why I used 'style' for the key.
And with regards to saving the model.value with 'px'... yeah, I already got that :)
The backoffice uses flexbox all over the place. All browsers, except IE, has full support for flexbox :)
Have a look at how the grid is rendered: https://github.com/umbraco/Umbraco-CMS/blob/dev-v7/src/Umbraco.Web.UI/Views/Partials/Grid/Bootstrap3.cshtml
Your key should be the css-property you want to set, in this case "padding". The modifier should not be needed (had it the other way round in my last reply).
Hi Søren,
About 30 mins after my last post, I actually discovered that file in the project, and once I spotted the helper functions that render the attribute, it all made perfect sense! So your last answer was spot on :)
I got the editor working great now. I even went on to create a back ground editor that allows the user to change settings like background image, position, colour, crop, width, colour, etc... very cool extensiblity point!
I will post my solution here shortly to help the community incase there are others wanting to do the same/similar thing.
For anyone interested in how to do this...
Create the plugin folder & files as follows: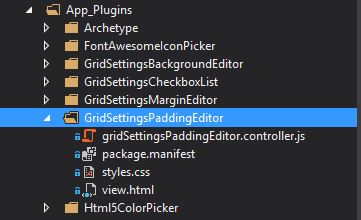
Next, create a new data type from the Grid Property editor in developer section, then click the edit link below 'Styles':
Add the following snippet in the dialogue, and save it...
Next, we add the controller code to the gridSettingsPaddingEditor.controller.js file:
Then, we code up the view....
Finally, we fillout the package.manisfest file...
Now you can add your new grid layout data type to your doc type, and after clicking the gear in the top right of the row/column, you will see your new settings editor....
And the rendered output looks like this...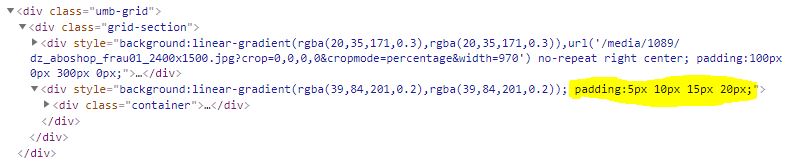
I get that the view could be done better (not using tables... I know, I was pressed for time) Hope this helps others too.
.
.
(For SEO)
Custom Grid Editor
Multiple Style editors
is working on a reply...
This forum is in read-only mode while we transition to the new forum.
You can continue this topic on the new forum by tapping the "Continue discussion" link below.