Upgrades in general
This is the guide for upgrading in general.
Important: If you are upgrading to a new major version, like from Umbraco 7 to Umbraco 8, make sure to check out the version-specific documentation.
Things may go wrong for various reasons. Make sure to ALWAYS make a backup of both your site's files and the database so that you can return to a version that you know works. You will need the backed up files for merging later so this step is not optional.
Before upgrading to a new major version (like v6 to v7), check if the packages you're using are compatible with the version you're upgrading to. On the package's download page, in the Project compatibility area, click View details to check version-specific compatibility.
Sometimes there are exceptions to these guidelines, which are listed in the version-specific guide.
Note
It is necessary to run the upgrade installer on each environment of your Umbraco site. So if you want to update your staging and your live site then you need to repeat the steps below and make sure that you click through the install screens so that your upgrade is complete.
Contents
In this article you will find instruction of 3 different ways of upgrading:
Upgrade using NuGet
You can open up the Package Console and type:
Update-Package UmbracoCms
You will be prompted to overwrite files, you should choose "No to All" by pressing the "L" . If there are any specific configuration changes required for the version you are upgrading to then they will be noted in the version-specific guide.
Or you can open the NuGet Package Manager and select the Updates pane to get a list of available updates. Choose the package called UmbracoCms and click update. This will run through all the files and make sure you have the latest changes while leaving files you have updated.
Upgrades to versions lower than 7.2.0
If you're not upgrading to 7.2.0 or higher then you should follow these extra instructions, if you are upgrading to 7.2.0+ then you can skip this and go to Merge UI.xml and language files
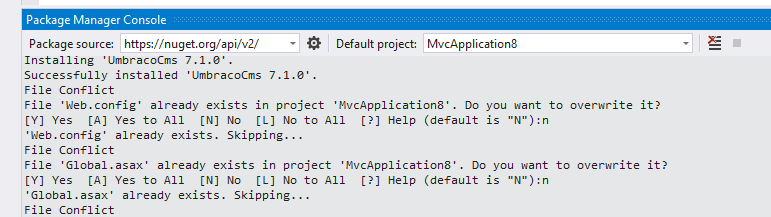
The following only applies to upgrading to versions lower than 7.2.0 You will be asked to overwrite your web.config file and the files in /config, make sure to answer No to those questions.
For some inexplicable reason, the installation will fail if you click "No to All" (in the GUI) or answer "L" (in the package manager console) to the question: "File 'Web.config' already exists in project 'MySite'. Do you want to overwrite it?" So make sure to only answer "No" (in the GUI) or "N" (in the package manager console).

Now here comes the tricky bit: We'll be mean and overwrite your web.config file anyway. But we'll back it up so don't worry. (Plus you already had your own backup, right?) You can find the backup in App_Data\NuGetBackup\20140320-165450\. (The 20140320-165450 bit is the date and time when the backup occurred, which varies.) You can then merge your config files and make sure they're completely up to date.
Upgrade manually from a zip file
Download the .zip file for the new version you are upgrading to from https://our.umbraco.com/download
Copy the following folders from inside the .zip file over the existing folders in your site:
- /bin
- /Umbraco
There are hosting providers (we know of one: RackSpace Cloud) that require proper casing of file and folder names. Normally on Windows this is not a problem. If your hosting provider however forces proper casing, you will need to verify that the folder and file names are in the same casing as in the newest version you're upgrading to.
Merge configuration files
You can expect some changes to the following configuration files:
- Any file in the /Config folder
- The /Global.asax file
- The web.config file in the root of your site (Important: make sure to copy back the version number, and the connection string as they were.)
- In rare cases, the Web.config file in the Views folder
Use a tool like WinMerge to check changes between all of the config files. Depending on when you last did this there may have been updates to quite a few of them.
There's also the possibility that some files in the /Config folder are new or some have been removed (we do make a note of this in the release notes). WinMerge (and other diff tools) is able to compare folders as well so you can spot these differences.
Up until version 6.0.0 it was necessary to change the version number in ClientDependency.config. This was to clear the cached html/css/js files in the backoffice. Change the current version number to one that's higher than that. Make sure not to skip this step as you might get strange behaviour in the backoffice otherwise.
Merge UI.xml and language files
Some packages (like Contour and Umbraco Forms) add dialogs to the UI.xml. Make sure to merge those changes back in from your backup during the upgrade so that the packages continue to work. This file can be found in: /Umbraco/Config/Create/UI.xml.
Packages like Contour, Umbraco Forms, and Courier also make changes to the language files located in: /Umbraco/Config/Lang/*.xml (typically en.xml).
Finalize
After copying the files and making the config changes, you can open your site. You should see the installer which will guide you through the upgrade.
The installer will do two things:
- Update the version number in the Web.config
- Upgrade your database in case there are any changes
We are aware that, currently, the installer is asking you for the database details of a blank database while upgrading. In the near future this will be pre-filled with your existing details and the wording will be updated. So no need to be scared. Enter the details of your existing database and Umbraco will upgrade it to the latest version when necessary.
Run an unattended upgrade
When upgrading your Umbraco project to Umbraco v8.12+ it is possible to enable the upgrade to run unattended. This means that you will not need to run through the installation wizard when upgrading.
Below you will find the steps you need to take in order to upgrade your project unattended.
Are you running a load balanced setup with multiple servers and environments?
Check out the section about Unattended upgrades in a load balanced setup.
Enable the feature
- Add the
Umbraco.Core.RuntimeState.UpgradeUnattendedkey toappSettingsin your web.config file. - Set the value of the key to
true.
<add key="Umbraco.Core.RuntimeState.UpgradeUnattended" value="true" />
Check the ConfigurationStatus
In order to trigger the actual upgrade, the correct version number needs to be set.
It is important to use the version number of the version that you are upgrading to. If this is not set, the upgrade will not run even if the UpgradeUnattended key has been set to true.
- Locate the
ConfigurationStatuskey in theappSettingssection in your web.config file. - Update the value to match the Umbraco version that you are upgrading to.
<add key="Umbraco.Core.ConfigurationStatus" value="x.x.x"/>
Run the upgrade
With the correct configuration applied, the project will be upgraded on the next boot.
While the upgrade processes are running, any requests made to the site will be "put on hold", meaning that no content will be returned before the upgrade is complete.
Boot order
The Runtime level will use Run instead of Upgrade in order to allow the website to continue to boot up directly after the migration is run, instead of initiating the otherwise required restart.
The upgrade is run after Composers but before Components. This is because the migration requires services that are registered in Composers and Components requires that Umbraco and the database is ready.
Unattended upgrades in a load balanced setup
Follow the steps outlined below to use run unattended upgrades in a load balanced setup.
- Upgrade Umbraco via NuGet in Visual Studio. Make sure the
Umbraco.Core.ConfigurationStatuskey inappSettingin theweb.configfile is updated to match the target version. - Deploy to all environments, including the updated
appSettingforUmbraco.Core.ConfigurationStatus. - Set the
Umbraco.Core.RuntimeState.UpgradeUnattendedkey inappSettingin theweb.configtotruefor the Main server only. - Request a page on the Main server and the upgrade will run automatically.
- Wait for the upgrade to complete.
- Browse the Read-Only servers and make sure they do not show the “upgrade required” screen.
Post installation
One important recommendation is to always remove the install folder immediately after upgrading Umbraco and never to upload it to a live server.
Potential issues and gotchas
Browser cache
Google Chrome has notoriously aggressive caching, so if something doesn't seem to work well in the backoffice, make sure to clear cache and cookies thoroughly (for other browsers as well). Normally the browser cache problem is automatically handled in an Umbraco upgrade by modifying the config/ClientDependency.config version number. If you however wish to re-force this update you can increment this version number which will ensure that any server-side cache of JavaScript and stylesheets gets cleared as well.
One way to nudge the cache in Chrome is to open the developer tools (F12) and go to the settings (the cog icon). There will be a checkbox that says "Disable cache (while DevTools is open)". Once this checkbox is on you can refresh the page and the cache should be invalidated. To force it even more, the "reload" button next to your address bar now has extra options when you right-click it. It should have "Normal reload", "Hard reload" and "Empty cache and hard reload" now. The last option is the most thorough and you might want to try that.