This article does not apply to Umbraco 8.
The concepts and code in this article have been deprecated in Umbraco 8 and no longer apply.
If you are using Umbraco 7, this article is perfect for you!
Creating Tables in Umbraco with PetaPoco
Overview
This guide will take you through the steps needed to create tables in Umbraco using PetaPoco and the ability to access data in those tables.
What is Peta Poco?
PetaPoco is a tiny & fast micro-ORM for .NET. It is tiny with no dependencies.
Requirements needed to use PetaPoco
- Umbraco 7+ with an SQL Database
- Nuget Peta Poco Package - Optional (https://www.nuget.org/packages/PetaPoco/)
Steps to create your first table
Setting up the folders
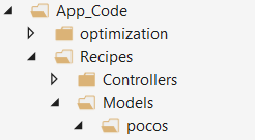
First, we need set up structure for our data and tables. Under the App_Code folder, create a Recipes folder. Next under Recipes create a folder called Models and under that folder create a folder called pocos or PetaPocos. In the pocos or PetaPocos folder the table will be created.
Creating our first table
Next, we need to create a table, we are going to call it Recipe. Next, we need to create a table, we are going to call it Recipe. In the sample code, line 4 and 5 are needed in order to set up the table in the database. Umbraco.Core.Persistence and Umbraco.Core.Persistence.DatabaseAnnotations contain the methods Umbraco uses for databases and table. The line after that is the path to the poco file. Here is some sample code, and we will explain it as well:
using System;
using System.Collections.Generic;
using System.Text;
using Umbraco.Core.Persistence;
using Umbraco.Core.Persistence.DatabaseAnnotations;

namespace Recipes.Models.pocos
{

    [TableName("CMSRecipes")]
    [PrimaryKey("RecipeId", autoIncrement = true)]
    [ExplicitColumns]

    public class recipe
    {

        [Column("RecipeId")]
        [PrimaryKeyColumn(AutoIncrement = true)]
        public int RecipeId { get; set; }

        [Column("RecipeName")]
        [Length(250)]
        public string RecipeName { get; set; }

        [Column("Description")]
        [SpecialDbType(SpecialDbTypes.NTEXT)]
        public string Description { get; set; }

        [Column("Directions")]
        [SpecialDbType(SpecialDbTypes.NTEXT)]
        public string Directions { get; set; }

        [Column("ServingSize")]
        [NullSetting(NullSetting = NullSettings.Null)]
        [Length(100)]
        public string ServingSize { get; set; }

        [Column("DateSubmitted")]
        public DateTime DateSubmitted { get; set; }

        [Column("DateApproved")]
        [NullSetting(NullSetting = NullSettings.Null)]
        public DateTime DateApproved { get; set; }

        [Column("UserId")]
        [NullSetting(NullSetting = NullSettings.Null)]
        public int UserId { get; set; }

        [Column("CategoryID")]
        public int CategoryID { get; set; }

    }
}
Implementing new table
Next we want to implement the table in the Umbraco website as well as the database. First we will create a PetaPocoApplicationEventHandler.cs file under the Recipes folder.
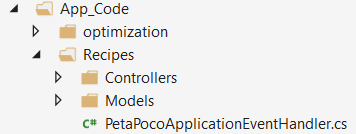
This file will help us create the new table Recipe for our site. One thing to note in the sample code, ApplicationEevntHandler and Umbraco.Core.Persistence are required to create the table. The first line is necessary to access the table code:
using Recipes.Models.pocos;
using Umbraco.Core;
using Umbraco.Core.Persistence;

namespace Recipes
{
    public class PetaPocoApplicationEventHandler : ApplicationEventHandler
    {
        protected override void ApplicationStarted(UmbracoApplicationBase umbracoApplication, ApplicationContext applicationContext)
        {
            var ctx = applicationContext.DatabaseContext;
            var db = new DatabaseSchemaHelper(ctx.Database, applicationContext.ProfilingLogger.Logger, ctx.SqlSyntax);

            if (!db.TableExist("CMSRecipes"))
            {
                db.CreateTable<recipe>(false);
            }

        }
    }
}
Once you restart the site, the table will be created. You will be thrown errors for any code issues before the table is created.
If you have access to the database, you can use Microsoft SQL Server Management Studio to check for the table.
Accessing the new table
Now, once we built our methods to access the data, we can use them in either Template, Partial View, or a Macro. When any of those files are being built, you must have the path to poco in your file. Here is an example of accessing the data in a Partial View Macro:
using System.Collections.Generic;
using System;
using System.Linq;
using Umbraco.Core.Persistence;
using Recipes.Models.pocos;

namespace Recipes.Models
{

    public class Recipes
    {

        // Saves Inserted data
        public recipe Save(recipe items)
        {
            UmbracoDatabase db = Umbraco.Core.ApplicationContext.Current.DatabaseContext.Database;
            db.Save(items);
            return items;

        }
        // Gets Recipe By Id
        public static recipe GetRecipe(int RecipeId)
        {
            UmbracoDatabase db = Umbraco.Core.ApplicationContext.Current.DatabaseContext.Database;
            List<recipe> Recid = db.Fetch<recipe>("SELECT * FROM CMSRecipes WHERE Recipeid = @0", RecipeId);
            db.CompleteTransaction();
            db.CloseSharedConnection();
            if (Recid.Count > 0)
                return Recid[0];
            else
                return null;
        }
        // Get Recipe By Name
        public static recipe GetRecipeID(string RecipeName)
        {
            UmbracoDatabase db = Umbraco.Core.ApplicationContext.Current.DatabaseContext.Database;
            List<recipe> Recid = db.Fetch<recipe>("SELECT RecipeID FROM CMSRecipes WHERE RecipeName = @0", RecipeName);
            db.CompleteTransaction();
            db.CloseSharedConnection();
            if (Recid.Count > 0)
                return Recid[0];
            else
                return null;
        }

    }
}
Now once, we built our methods to access the data, we can use them in either Template, Partial View or a Macro. When any of those files are being built, you must have the path to poco in your file. Here is an example of accessing the data in a Partial View Macro:
@inherits Umbraco.Web.Macros.PartialViewMacroPage
@using Recipes.Models.pocos
@using Recipes.Models
<div class="page-header clearfix">
    <h2 class="page-title pull-left">
        Recipes <span id="spinner" class="loaded"><i class="fa fa-spinner fa-spin fa-sm"></i></span>
    </h2>
</div>

<div class="toolbar-grid clearfix">

</div>

<table class="table table-bordered table-striped table-hover table-responsive" id="results">

            <thead>
                <tr>

                    <th>Name</th>
                    <th></th>
                    <th>Status</th>
                    <th>Date Submitted</th>

                </tr>
            </thead>


            @{
            foreach (var Allrecs in Recipes.GetAdminRecipes())
            {

            <tr>
                <td><a href="/recipe-update-form.aspx?id=@Allrecs.RecipeId">@Allrecs.RecipeName</a></td>
                <td><a href="/recipe-page?id=@Allrecs.RecipeId&@Allrecs.RecipeName">View</a></td>
                <td>
                    @switch (@Allrecs.StatusId)
                    {
                    case 1:
                    <div>Submitted</div>
                    break;
                    case 2:
                    <div>Approved</div>
                    break;
                    case 3:
                    <div>Rejected</div>
                    break;
                    case 4:
                    <div>Deleted</div>
                    break;

                    }
                </td>
                <td>@Allrecs.DateSubmitted</td>
            </tr>

            }

            }

        </table>
Conclusion
This is a way of implementing external database tables into your Umbraco website.
Related Links
Below are some links to more resources, in case you want to further your learning.